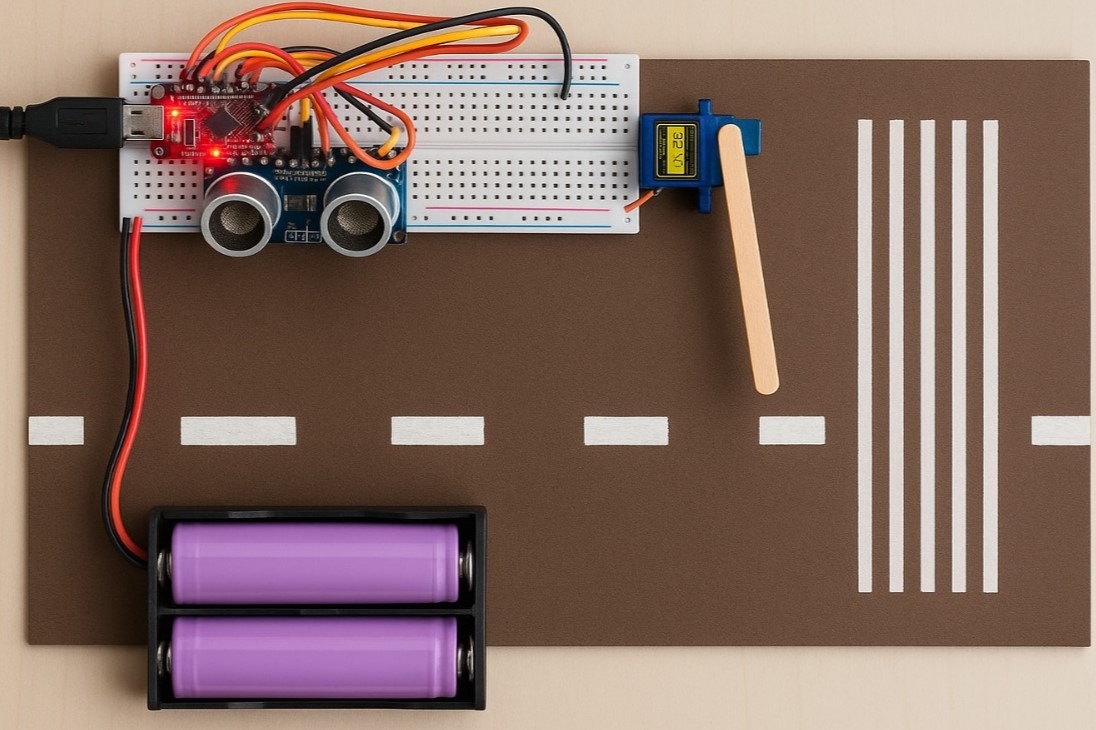
Project Overview:
This project demonstrates how to build an automatic gate system using an ultrasonic distance sensor (HC-SR04) and a servo motor, controlled by an Arduino. When an object or person is detected within a specified range (15 cm), the gate opens automatically using a servo motor. After a short delay, the gate closes again.

Components Required:
-
Arduino UNO / Nano / Mega
-
Ultrasonic Sensor (HC-SR04)
-
Servo Motor (SG90 or similar)
-
Jumper Wires
-
Breadboard or PCB
-
5V Power Supply
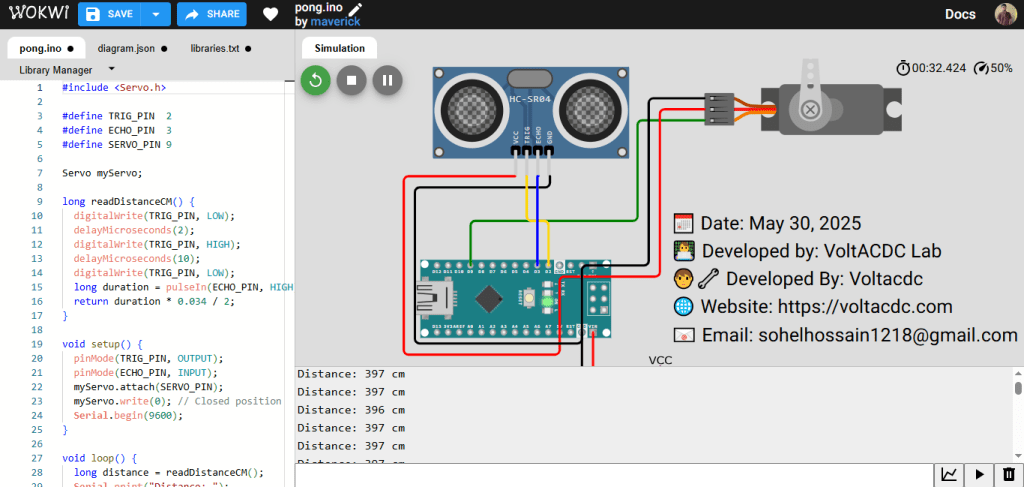
Simulation View
Arduino Code:
/*
Project Title: Automatic Gate Using Ultrasonic Sensor & Servo Motor
Description:
This project reads distance from an ultrasonic sensor and controls a servo motor
to simulate an automatic gate or barrier. When an object is detected within 15 cm,
the servo rotates to 90 degrees (open position). Otherwise, it stays at 0 degrees (closed).
Developed by: Your Name
Organization: VoltACDC Lab
Date: 30 May 2025
Version: 1.0
Hardware Requirements:
- Arduino UNO/Nano/Mega
- Ultrasonic Sensor (HC-SR04)
- Servo Motor (SG90 or similar)
- Jumper Wires
- Power Source (5V)
Library Required:
- Servo.h (Built-in Arduino library)
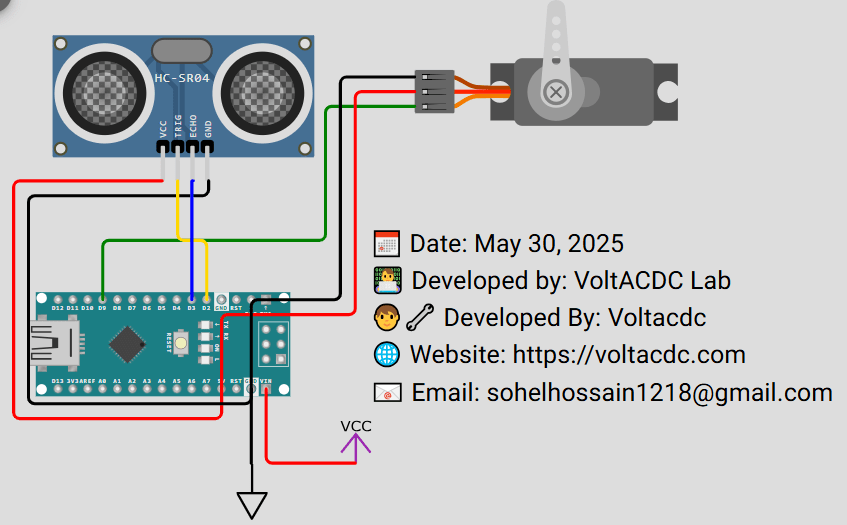
Circuit Connections:
- HC-SR04 TRIG -> Digital Pin 2
- HC-SR04 ECHO -> Digital Pin 3
- Servo Signal -> Digital Pin 9
- VCC and GND -> 5V and GND (common ground)
License:
Free to use for educational and non-commercial use.
Contact developer for commercial licensing.
Note:
- You may adjust the distance threshold (currently 15 cm) based on your requirement.
- Make sure the servo gets enough power if it behaves erratically.
*/
#include <Servo.h>
// Pin Definitions
#define TRIG_PIN 2
#define ECHO_PIN 3
#define SERVO_PIN 9
Servo myServo;
// Function: Read distance from ultrasonic sensor (in cm)
long readDistanceCM() {
digitalWrite(TRIG_PIN, LOW);
delayMicroseconds(2);
digitalWrite(TRIG_PIN, HIGH);
delayMicroseconds(10);
digitalWrite(TRIG_PIN, LOW);
long duration = pulseIn(ECHO_PIN, HIGH);
long distanceCM = duration * 0.034 / 2;
return distanceCM;
}
void setup() {
pinMode(TRIG_PIN, OUTPUT);
pinMode(ECHO_PIN, INPUT);
myServo.attach(SERVO_PIN);
myServo.write(0); // Start at 0 degree (closed gate)
Serial.begin(9600);
}
void loop() {
long distance = readDistanceCM();
Serial.print("Distance: ");
Serial.print(distance);
Serial.println(" cm");
// If object is within 15 cm, open gate
if (distance > 0 && distance < 15) {
myServo.write(90); // Open position
} else {
delay(500); // Optional delay before closing
myServo.write(0); // Closed position
}
delay(100); // Debounce delay
}
GitHub Repository:
Conclusion:
This project is a simple yet effective way to learn how sensors and actuators work together with Arduino. Perfect for smart gate prototypes, automation learning, or fun DIY projects